Category Archives: Kids Bedroom

Choosing Fabric For A Shared Kids Room

I’ve been looking around at bedding for the kids on and off over the summer, trying to decide what we want to do. We are anticipating transitioning Brendan to a big bed soonish and moving them both to a bunk bed (which Emma is so excited for!). Since we started work in their room I’ve been thinking that a bunk bed would really fit well in there and open up their floor space even more for play.

Kids Room After - Landscape view

I’ve looked around at all sorts of colours and patterns and lately I keep going back to a homemade striped quilt (sort of like this or this). I love being able to pick and choose the fabrics and the imperfect handmade feel appeals to me.

The past two weeks I’ve been playing around with fabric and mix and matching patterns online, trying to decide what to put together for the kids room. Emma requested pink on her bedding so I found this beautiful Amy Butler print called Pressed Flowers in Carmine that she and I both loved so that became our starting off point.

Amy Butler Cameo Pressed Flowers In Carmine

I decided to try this handsome Moroccan Lattice print in Clementine from Michael Miller for Brendan’s main fabric. I’m hoping the pink and red combination will play off each other well.

Michael Miller Moroccan Lattice Clementine Fabric 1

Then I brought in some navy blues to balance out the warm colours, a few more patterns and some fun etsy pillows and this is where we are today.

Girl’s Bedding Mood Board

Girl's Bedding Mood Board

1. Whale pillow. 2.  Pink flowered fabric. 3. Navy striped fabric4. Black ticking fabric. 5. Polka dot pillow. 6. Purple and tangerine fabric.

Boy’s Bed Mood Board

Boy's Bedding Mood Board

1. Bike pillow. 2. Lattice print fabric. 3Navy striped fabric4. Black ticking fabric. 5. Stripe pillow.  6. Polka dot fabric.

So now I need to order some fabric swatches to feel and play around with before taking the leap. I’ve done quite a few different kinds of sewing projects before but never a full sized quilt so that part feels a little scary. Mostly because of the machine quilting, which I’ve only done a little of, so I’ve been waffling a bit. But I’d also love to be able to do it and I think the kids would love them so I probably just need to go for it. Because how much fun would these be on their beds?

I’m thinking of pairing them with matching neutral cotton blankets for extra warmth and a fun pillow or two. And maybe the black ticking for their curtains?

Black Woven Ticking 2

Not sure yet what to do for them. We’ll have to see where we end up. But I love having a good reason to play around with pretty fabric.

Have you ever ordered fabric online? What’s your favourite way to pull together fabrics for a room?

Picture Book Shelves

If you peek down the hall to the kids room, this is what you will see. Floor to ceiling shelves full of picture books.

Picture Book Shelves1

I had been wanting some shelves in the kids room from all the way back in their old room in our previous rental. We had looked at these plans from Ana White for her picture ledges and thought they would be perfect. We found some wood that would work for them from our stash and cut it to length but hadn’t gotten around to actually assembling them, as we ended up moving soon after.

After seeing this wall by the door in the kids new room, we thought it would be the perfect place for them. It is narrower than the wall we had originally planned to put them on though, so we had to make them shorter to fit. We ended up cutting the wood in half to make six smaller shelves instead of the original three bigger ones, which worked out quite well.ana-white-ten-dollar-ledges-1

ana-white.com

This was our first project using the Kreg Jig and it worked great to join the boards. We filled the screw holes with wood filler and sanded them smooth. I decided to go with a whitewash finish as I love the look and wanted to try it out. I put it on a little thick so I didn’t get as much wood grain showing through as I would have liked, but they were still pretty and we hung them up and filled them with the kids books. I love how they filled up that wall.

We took them down before painting the kids room and decided to take the sander to them while they were down to get a little more of the wood showing through. Dan went over them with the belt sander and now they have a beautiful worn look to them which made me completely fall in love with them again.

Picture Books Shelves - Paint finish

And here they are all filled up with books. They fit perfectly between the door and the wall and I love how they make the awkward end of the closet wall look more purposeful.

Picture Book Shelves2

The kids love having so many of their books in here. They use them during quiet time in the afternoon and for a close by bedtime story. I love all the colour they add to their room.

Picture Book Shelves Close Up

We keep board books on the lower two shelves so Brendan can reach them and the older storybooks higher up for Emma. I rotate the books with others from the living room every once in a while to give them a little variety.

Picture Book Shelves - Brendan playing

I love a wall full of bookshelves. These ones are especially fun because we have an ever changing art display with all those illustrations. Seeing them all right there makes them so inviting and the kids use them almost every day. They are the perfect addition to their room.

Linked to: Miss Mustard Seed

Kids Room Redo: Painting

To read part one of the kids room redo go here.

Now that we were finished all the prep work we were finally ready for paint! But first we had to pick out paint colours.

For the trim and ceiling planks we wanted to do a pure white as we love the crispness and lightness it brings to a room. We also decided to go all white in the closet, because we wanted something simple that wouldn’t contrast with the closet built ins. With all that white to paint in the room, we were toying with the idea of buying a paint sprayer to cut down on painting time (especially as we expect to have lots more big painting projects in our future). When we heard that my father-in-law had one that we could borrow, we jumped for it.

We used Behr’s Paint and Primer in One in a base white, semigloss finish. The paint and primer in one really cuts down on painting time and I’m all for that! To prep the room for the paint sprayer, we taped down brown paper to cover the floors and window from the overspray. It took us about an hour to get the room covered and it was totally worth the prep.

Kids Room Makeover - Taping brown paper to protect floor

The paint sprayer is a Wagner Power Painter and worked well for the job. It took a little bit of practice to find a good technique, as we realized that it gave a nice even spray until it ran low on paint and then it would tend to splatter as it didn’t have a consistent flow of paint anymore. Once we figured that out we would just keep an eye on the paint level and fill it up again before it ran out of paint. After refilling the paint container we’d do a few test sprays on the floor to make sure the new paint got through the machine before we started again and it was smooth sailing.

Dan sprayed on the first coat of white in the room, which took about forty-five mintues. He was able to tilt the sprayer at a 45 degree angle to get the whole closet and ceiling too, which worked well and was so much better then doing it by hand. He sprayed the second coat on the next day in half an hour and all the trim work and closet were done. It was so fast! The ceiling needed one more light coat (as it was the only wood that didn’t start out pre-primed) so I finished that up the next day. The paint finish was amazing. Smooth, perfect trim with no brush strokes and no cutting in. How great is that?

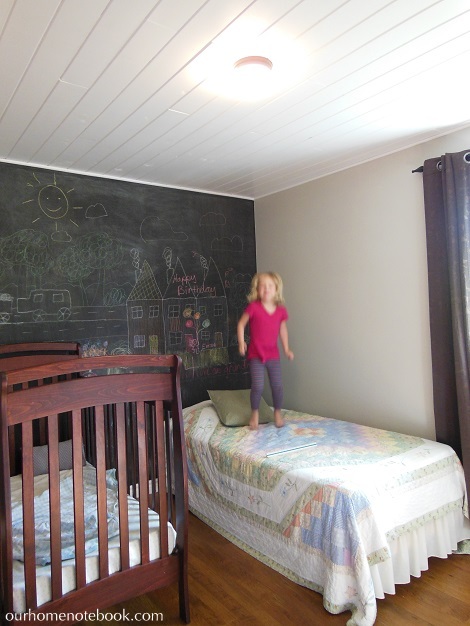
And now I really had to decide on the wall colour. The far wall I knew I wanted to do as chalkboard wall as I thought it would be so much fun for their room (like this and this). I wanted a light, neutral colour for the rest of their walls and I had been going back and forth between paint swatches for a couple weeks, but was having trouble finding one with the undertones I wanted.

Kids Room Makeover - Getting ready for paint

First I got a test pot of Behr’s Burnished Clay and tried it on the walls, but it had a slight pink undertone in certain light that I didn’t want. So then I went to Behr’s Painter’s White, a lighter and safer version of the same shade. They couldn’t mix up a test pot for me because the colour was so light they wouldn’t have been able to get the colour quantities right for so small an amount, so we taped up a large section of paint swatches instead. It looked good next to the trim and so much better then the previous colour so we decided to go for it.

That evening I cut in while Dan rolled and we got the room painted in a few hours. I painted the chalkboard wall the next afternoon during naptime and we gave the rest of the walls another coat the next night as the green from underneath was still showing through a bit. The next day I put the last coat of chalkboard paint on the wall and started cleaning up the brown paper. Once I got the paper off the window I started getting worried. With all that natural light coming in the window…I was either going crazy, or their walls looked pink. Again.

Kids Room Makeover - First paint colour

I tried living with it for a few weeks just to be sure, because sometimes it looked more like the creamy off white it was supposed to be. But as soon as the afternoon sunlight would come in the window a light pink tone would appear on the walls.

Kids Room Makeover - Painted closet

So we decided to paint it again. We realized that two hours and a can of paint were worth it to get a colour we liked. But now I had almost no confidence in my paint picking abilities for their room. I talked about just going white as I think it can look sharp with a chalkboard wall, but Dan was leaning towards something with more contrast with the trim. So I pulled out all my paint swatches again and we found Benjamin Moore’s Grey Heron. It’s a light gray/green which I liked and Dan was decidedly more in favour of it than the first colour, so that gave me some hope. It’s amazing what two hours, an understanding husband and a can of paint can do.

Kids Room After - Landscape view

We colour matched Benjamin Moore’s Grey Heron to Behr’s Paint and Primer in One in an eggshell finish. We were able to get good solid coverage in one coat this time, which was so nice. All the prep work on the walls to fill the small cracks really paid off too because the paint job looks so much smoother then the previous one. Dan also changed out all the old brown electrical outlets for new, white tamper resistant ones, which look great and work so much better for us with the kids.

Kids Room After - Chalkboard wall

The kids favourite part is the chalkboard wall. It’s mine too. It’s so much fun and makes such a great statement in the room. The kids and I make a new picture once a month or so when we are looking for something to do together and the kids change up the lower wall more often. It’s definitely a hit.

Kids Room After - Chalkboard side view

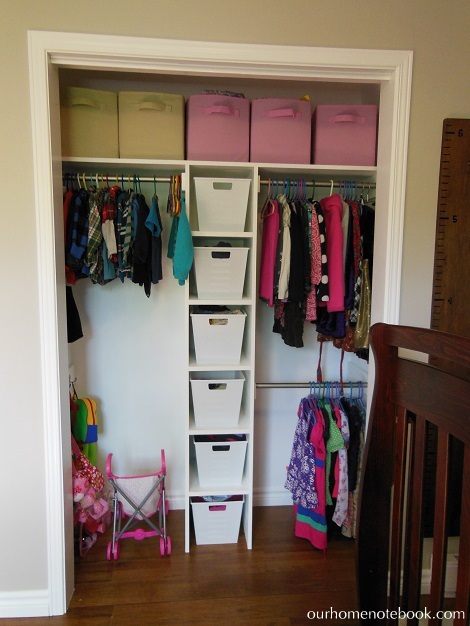
The closet shelving turned out great. It fits all their clothes and more. I love being able to hang up so much of their clothing. It cuts down on my folding time and it’s so easy to see what’s there when picking an outfit. I have Brendan’s clothing on the left and Emma’s on the right so she can reach it, and they each have three of the middle bins. Their clothes that are a size too big or anything they’ve just grown out of goes up in the top bins until I put them away or they grow into them. All Emma’s purses hang on the low hooks on the left and its so nice to finally have a spot for them to keep them all in order.

Kids Room After - Closet

Isn’t the white planked ceiling beautiful? I love it all glossy white. It adds so much character to the room. For their light fixture, Dan installed this one from Canadian Lighting Universe. I love the style and how it compliments the room, especially the chalkboard wall but it might be a little small. If we find something that fits here better down the line, I’m thinking we can move it to the hallway which would probably fit its size better.

Kids Room After - Portrait view

I’d still like to hang some art on the walls, change out the curtains for something floor length and get some bifold doors for their closet, but I’m so happy with how far this space has come. It makes me smile. Now that the walls are more calm, I love how their toys bring colour and life to the room, without all the busyness of before. I love watching them play in here. They seem to like it a lot too.

Kids Room After - Emma jumping on bed

Linked to: Emily A. Clark

Kids Room Redo: The Plan and Prep

When we bought our house, the kids room had lime green walls with a chocolate brown accent wall. It was fine – but definitely not our style. We loved the floors, which run seamlessly through the whole upstairs (minus the bathroom and garage entry). They are a beautiful, medium toned wood like laminate. We also loved the generous closet and bigger room size.

Kids Room Before

But I was craving a little more calm on the walls so we decided to paint here first, as all the other colours in our house are more neutral and not begging so much for a fresh coat of paint. The trim also needed to be painted as it was only primed (as is the rest of our house) when the previous owners installed it.

We also wanted to add an overhead light (as they only had a switched plug), upgrade and move the baseboard heater, add more built in shelving to the closet and replace the damaged ceiling, which were all before painting jobs. So we decided to tackle it all in one go and get all the messy jobs done at once. I was so excited to start in on it. (What can I say? Making things functional and pretty makes me happy). We moved the kids into our room where they got to camp out for a week and a half while we worked away in the evenings and weekends to get it done. It was great to have it fully as a work zone, even though we pushed to get it done in good time so the kids could have it back, it was so much easier to do the work without having to clean it back up for living space between every job.

Kids Room Makeover

First, Dan added an electrical box to the ceiling so we could have a switched overhead light. His Dad is an electrician and he worked quite a few summers with him so he’s great at this kind of stuff. It made such a difference in the room, especially to our sometimes scared of the dark little girl. It really brightened the room up. He also added a second switch in case we ever want to add a overhead fan in here, it can be switched separately.

Then we set out to build a little more storage into their good sized closet. It started out pretty standard – one shelf with a hanging bar below. I thought we could get better use of space, especially with the kids little clothes, if we built a row of cubbies up the middle of the closet and added a second hanging bar on the right side (leaving the left side with only one high hanging bar for Emma’s dresses, etc. as she grows). I also wanted to add a row of hooks below the high hanging bar to hold Emma’s purses. Seriously, that girl has more then I do!

Kids Room Makeover - Building a closet organizer

We built the shelving out of 3/4″ MDF and it was a nice Saturday afternoon project. So much more functional now.

Dan also moved the old baseboard heater from under the window and installed a newer, more efficient model on the wall to the right of the closet. With the baseboard moved I could then put up floor length curtains without them getting in the way of the heater. I love how they soften up a room and I love that Emma can open or close them herself (we always close them before the kids nap or go to sleep at night so they get moved a lot). Emma even got out her tools to help.

Kids Room Makeover - Emma helping

We added new baseboard moulding where the old heater had been and some in the closet too, where there hadn’t been any before.

The ceiling was our last project before we could break open the paint. It was a textured plaster finish which wasn’t our favourite and the drywall itself was problematic. It was slightly saggy between the ceiling joists which resulted in waves across the ceiling. Not a good look. It seems like the drywall that was installed on the ceiling wasn’t thick enough which is why it tended to sag.

Kids Room Before - Ceiling

We debated between strapping and re-drywalling the ceiling or planking it with painted white boards. We decided to go with the planking as we both loved the look and thought it would be easier to install. We spent about two evenings working until midnight or so to get it done. We were very thankful the kids slept through all that hammering. We started out by trying a few hardboard paneling planks on the ceiling, but they weren’t rigid enough to hold their shape and had that same sagging between the joists. We considered using paneling adhesive to hold it up better but worried that the hardboard would then follow the waves in our ceiling as it didn’t have a good flat surface to adhere to. In the end we decided to go with the safe option and bought beautiful thick pine tongue and groove boards, which finally gave us a nice flat ceiling.

Kids Room Makeover - Planked ceiling boards

It definitely helped having both of us to work on this project together. I held up and fit one end of the board while Dan fit and hammered a few nails in the other end. Then I’d measure and go cut the next board in the garage as Dan finished nailing the current board in place. We finished off the edge with some simple quarter round. It was so exciting to see it take shape.

Kids Room Makeover - Filling holes with dap

I finished up the prep work by filling all those little nail holes with dap and sanding them smooth. The ceiling wasn’t so hard as it was easier to sand but the trim was a little tricky to get smooth. I also filled a lot of small cracks in the plaster walls and a few nails holes. It feels like it takes forever, but smooth trim and walls are so worth it! A lot of white sanding dust later – and we were finally ready for paint.

To read part two of the kids room redo go here.